
This project will be a short documentation of how I built my small 2-node Raspberry Pi 5 k3s cluster on a small budget with a minimal redundant setup.
My main goal is to get familiar with Kubernetes fundamentals like objects, networking, and storage. I believe that there are many people out there who want the same, which is why I’m sharing this with you. This documentation is a mix of my personal decisions — what I did and why — and a step-by-step guide for you.
Right now, this is what the cluster looks like:
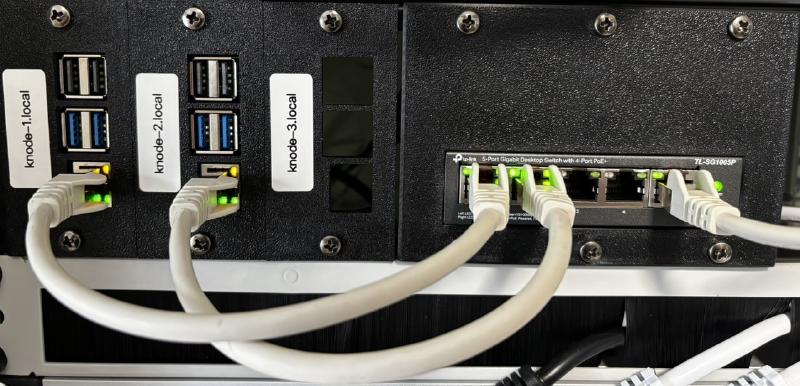
As you can see, there are already three slots for an additional Raspberry Pi, which I plan to add once I’m more familiar with the current setup.
List of Hardware Components#
| Name | Quantity | Link |
|---|---|---|
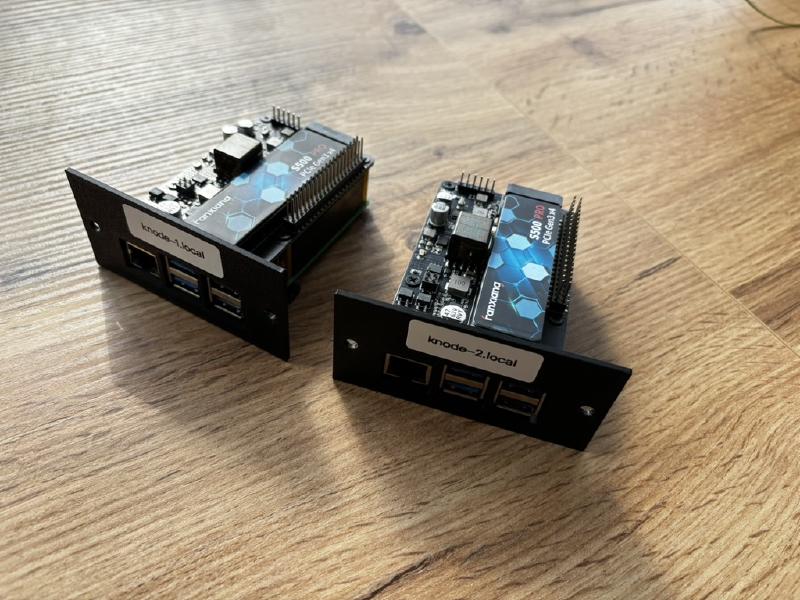
| Raspberry Pi 5, 8GB RAM | 2 | berrybase.de |
| GeeekPi P33 M.2 NVME M-Key PoE+ Hat | 2 | amazon.de |
| Fanxiang M.2 SSD 512GB | 2 | amazon.de |
| 2U DAP rack panel | 1 | musicstore.de |
| TP-Link TL-SG1005P PoE Switch | 1 | amazon.de |
| SanDisk 32 GB micro SD card | 1 | amazon.de |
Total costs: 395€ / 448$
Printables#
| Name | Quantity | Link |
|---|---|---|
| TL-SG1005P Rack Mount | 1 | berrybase.de |
| Raspberry Pi 5 Rack-Mount | 2 | printables.com |
The Setup#
First, after assembling the components for the Raspberry Pis, I had to create a bootable SD card with Ubuntu Desktop on my PC to boot the Raspberry Pis. Later, I’ll need Ubuntu Desktop to make the NVMe drives bootable for the Raspberry Pis.
To make the SD card and NVMe’s bootable, I use the Raspberry Pi Imager.
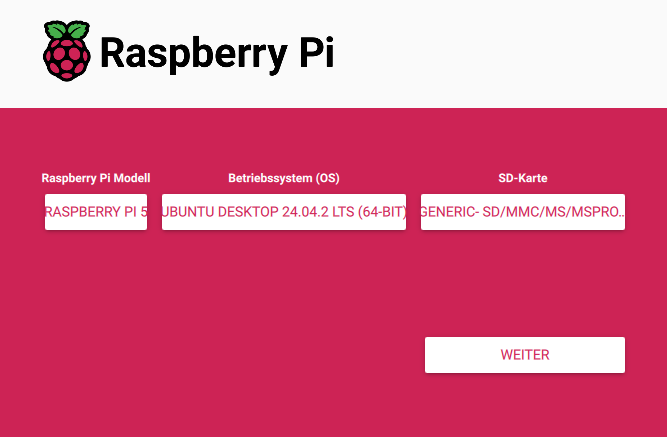
After creating the bootable SD card, insert it into the first Raspberry Pi and power it on. Once the Pi has booted, download the Raspberry Pi Imager again – this time directly on the Pi.
Then use it to flash Ubuntu Server onto the NVMe drive, which will later be used to run the k3s cluster. This is also the point where you should set the hostname for the Pi. I will skip this part in the documentation. Repeat this step for all other Raspberry Pis.
Configure static IPs#
If you want your Raspberry Pis to use static IPs instead of DHCP (for example, because you don’t have a DNS server to resolve their hostnames for SSH access), you should adjust the network configuration accordingly:
# 1. change dhcpcd.conf
sudo nano /etc/dhcpcd.conf

# 2. setup static IP
interface eth0
static ip_address=192.168.1.50/24
static routers=192.168.1.1

# 3. control + X to save changes
Repeat this step for all other Raspberry Pis.
Installing k3s#
Why k3s? (Talos vs k3s)#
Before setting up the cluster, I considered a few lightweight options for the setup. Talos OS and k3s made the shortlist.
Unfortunately, Talos OS currently doesn’t support the Raspberry Pi 5, and there’s no community workaround available either — so I went with k3s. However, a major advantage of k3s is that the nodes can also be used later for purposes other than Kubernetes. For example, for automation, Docker and so on.
Install the master node#
First, choose one of your Raspberry Pis to act as the master node (now called the control plane). It will run the Kubernetes API server and manage the cluster.
Then, on that Pi, run the following:
# Update repositories and upgrade existing packages
sudo apt update && sudo apt upgrade -y

# Install curl
sudo apt install curl -y

# Install k3s
curl -sfL https://get.k3s.io | sh -

# Copy the k3s token (you’ll need it for the agent nodes)
cat /var/lib/rancher/k3s/server/node-token
This sets up your master node.
The k3s service is now running and managed by systemd. You can check the status with:
sudo systemctl status k3sA master node (now called control plane) manages the Kubernetes cluster – it schedules workloads, maintains the desired state, and handles scaling. An agent node (or worker node) runs the actual applications (pods) and reports back to the control plane.
Install the agent node(s)#
Next, install the agent nodes using the IP address of the master node and the token you copied earlier. Do this on each of your other Raspberry Pis:
# Update repositories and upgrade existing packages
sudo apt update && sudo apt upgrade -y

# Install curl
sudo apt install curl -y

# Install k3s and join the cluster (replace <MASTER_IP> and <NODE_TOKEN>)
curl -sfL https://get.k3s.io | K3S_URL=https://<MASTER_IP>:6443 K3S_TOKEN=<NODE_TOKEN> sh -
Make sure your master node is reachable from the agent nodes on port 6443. If you’re using a firewall or NAT, ensure this port is open and accessible.
Once joined, you can check the cluster status on the master node with:
kubectl get nodesYour cluster should look like this:

Setup remote control (only for MacOS users)#
To manage your Raspberry Pi k3s cluster from your Mac, you first have to install kubectl with homebrew:
brew install kubectlYou can verify the installation with:
kubectl version --clientAfter installing kubectl you have to copy the kubeconfig from your master-node to your mac. The config is located at (on your Pi): /etc/rancher/k3s/k3s.yaml Make sure the ~/.kube directory and config file exists on your mac; if not, create it:
mkdir -p ~/.kube

# create the config file on your mac
touch ~/.kube/config
Copy the content of the /etc/rancher/k3s/k3s.yaml:
nano ~/.kube/config

# Replace Server IP with the actual IP address of your master Raspberry Pi:
# Find the line:
server: https://127.0.0.1:6443
# Change it to:
server: https://<MASTER_IP>:6443
# Save and close the file
Now you can test your connection with:
kubectl get nodesYou’re now ready to deploy things in Kubernetes!
Storage#
Once you become more familiar with Kubernetes, you’ll quickly encounter the topic of persistent storage. The challenge with the current cluster setup is that a pod can only claim storage from the local disk of the node it’s running on. If the scheduler moves the pod to a different node (e.g., due to a node failure), the pod may no longer have access to its previously claimed storage.
While it’s possible to use NFS as a shared storage solution, in this project we’re focusing solely on the Raspberry Pi cluster and assume that no external storage is available.
According to the CNCF landscape, there are several options to provide redundant, highly available storage within a Kubernetes cluster. Two popular choices for homelab setups like this are Rook Ceph and Longhorn.
Rook Ceph is a powerful, production-grade distributed storage system, but it requires more resources and is relatively complex to set up and maintain — especially on low-power devices like Raspberry Pis.
Longhorn, on the other hand, is lightweight, easy to install, and specifically designed for cloud-native environments. It’s well-suited for small clusters and works reliably on ARM-based devices.
That’s why I went with Longhorn for this setup.
Deploying Longhorn#
According to the k3s-Longhorn documentation, you can install Longhorn with the following command:
kubectl apply -f https://raw.githubusercontent.com/longhorn/longhorn/v1.6.0/deploy/longhorn.yamlLonghorn will be installed in the namespace longhorn-system.
You’re now ready to create volumes using Longhorn!
Here’s a quick example manifest:
apiVersion: v1
kind: PersistentVolumeClaim
metadata:
  name: longhorn-volv-pvc
spec:
  accessModes:
    - ReadWriteOnce
  storageClassName: longhorn
  resources:
    requests:
      storage: 2Gi
---
apiVersion: v1
kind: Pod
metadata:
  name: volume-test
  namespace: default
spec:
  containers:
    - name: volume-test
      image: nginx:stable-alpine
      imagePullPolicy: IfNotPresent
      volumeMounts:
        - name: volv
          mountPath: /data
      ports:
        - containerPort: 80
  volumes:
    - name: volv
      persistentVolumeClaim:
        claimName: longhorn-volv-pvc
After saving, apply it with:
kubectl apply -f <your_file>.yaml

# Then confirm that the PV and PVC have been created:

kubectl get pv
kubectl get pvc